Showing posts with label china glaze. Show all posts

2 June 2014

Rainbow Gradient Nails

Oh my...I made a rainbow and now I never want to take these nails off! And it sparkles...winning! Finally a new collection where I love every colour and they worked together to create a rainbow, what's not to like about that! China Glaze - Offshore collection - Available now from Drama Queen Nails. 


To create this mani I started with a white base using Morgan Taylor - white. I waited for it to dry completely then I used a make up sponge to apply the gradient. Check out the sponge...more rainbow! If you are getting chunks when you do gradients that's an indication that the polish on the sponge is too dry and is sticking to your nail. Prime up your sponge with more polish and wait for the first coat to dry to stop this from happening.


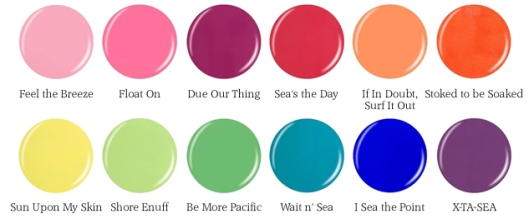
All the polishes I used to create the rainbow are from the new China Glaze - Off Shore collection. This is a GREAT collection, bright crellies that went on perfectly in two coats. The green - Be More Pacific - was a tiny bit streaky and needed 2 coats when I used it on its own, but mixed into the gradient it was fine. I topped off the rainbow with a layer of  holo sparkles: Out the Door - Northern Lights - available here. 


I highly recommend this collection, even with my *ahem* large polish collection I found that the tones were unique and I had nothing like them. My fav of the bunch is the purple - XTA Sea - and the teal - Wait n' Sea. There isn't one colour that I wouldn't use and for a long time there hasn't be a collection that I have NEEDED every colour. Well done China Glaze, well done! Available now from Drama Queen Nails. 


10 June 2013

More fun with striping brushes

One of the most versatile tools in a nail artists arsenal is the striping brush. They are a little like dotting tools in that they can do much more than just dots, or in the case of a striping brush more than just stripes. Now you could go out and buy a whole heap of striping polishes or you can buy one set of striping brushes which will allow you to use any of the polishes you already own. You may not get the precise perfect lines that you would achieve with striping tape or stamping but there is a whole lot less mucking around and its much quicker. So lets take a look at another design created with striping brushes. This design is inspired by Hey Nice Nails.
 
 
Freehand stripes are a great way to start experimenting with your striping brush. I did my accent finger in 2 minutes with none of the hassle of cutting and placing tape, not to mention being able to skip having to add a layer of topcoat before applying the tape so it doesn't pull your base colour up. The trick to using striping brushes is simple: Move your finger not the brush. Place the brush on the edge of your nail as and you pull the brush back roll your nail from one side to the other to create the stripe. This is my very first time doing freehand horizontal stripes with a brush and whilst they are far from perfect I found the technique easy and feel confident I can improve and get my lines to be a more consistent width.

 
To create the animal print I used the smallest striping brush in my set and made "c" shapes around the glitter dots with Barry M - Black. I placed the glitter dots randomly just using the brush from the polish bottle. I love animal print because its not meant to be perfect. If you don't have striping brushes you could create this print with dotting tools, or a striping polish. The striping polish in this picture is Le Chat Colour Madnic - Black.
 
 
The pink base is Essie - Not just a pretty face. Its is sheer jelly and it took 3 coats to get this colour. It could have done with another coat actually because there is a little bit of VNL on my middle finger, but the colour is so pretty and I don't have any cremes in this shade. The glitter is China Glaze - I'm not lion. So don't be afraid to give freehand stripes a go and experiment to see what else you can create.

2 April 2013

Light it up blue for World Autism Awareness Day

So many of you might not know that apart from being a nail queen by night, by day I'm a special needs teacher. I teach at a gorgeous state school in Brisbane and the kids I work with are really lovely, they thank me for teaching them nearly every day....really! So it was a no brainer to light it up blue for World Autism Awareness Day. Another reason, my niece is Autistic and she is one of the smartest, most interesting, well mannered and loving kids I know. This first picture was taken out in the sun to "light up" the beautiful blue glitter. This ones for you Sophie.


I am a specialist ASD teacher which stands for Autism Spectrum Disorders. Some well known spectrum disorders include Autism, Asperger's Disorder, and Rett's Disorder. The most common spectrum disorder is Autism. Autism is a complex neurobiological disorder that typically lasts throughout a person's lifetime. People with ASD have problems with social and communication skills. Many people with ASD also have unusual ways of learning, paying attention, or reacting to sensations. In most cases its causes are unknown. Today, 1 in 110 individuals is diagnosed with autism. If you would like more information about Autism please check out the Autism Awareness website.


The polishes and tools I used in this mani:

China Glaze - Refresh Mint

If you would like to give this mani a go its not too hard, just a little time consuming. I applied the striping tape over a layer of clear base coat (which was super dry btw). Then I used a small brush to paint each section of colour. I pulled off the striping tape then applied a layer of Seche Vite to dry it all. I waited a good 10 minutes to make sure it was really dry. Then I reapplied the striping tape in the exact same position as before, and added another layer of top coat. 


So show your support for Autism Awareness Day and all Australians with Autism by wearing something blue, and check out the Sydney Opera House tonight to see it lit up blue. If you go blue, share your picture on instagram and tag #bluenailsforautism #lightitupbluenails #lightitupblue #autismawareness

Aussie Nails Monday - Inspired by clothing

Just a quick post today, my nails for Aussie Nails monday. This week the theme was inspired by clothing. 


I was inspired by the gradient on this top I bought last year, if only my top was as bright as my nails! Click here for a tutorial for the gradient technique, for this mani I did step 1 to Step 3. 

The colours I used for this mani:

Chin Glaze - Im with the lifeguard (green)
China Glaze - Sunkissed (yellow)
China Glaze - Orange you Hot? (orange)
Barry M - White, as a base colour underneath the gradient.
*All these colours are available and in stock now if you like the look of them.

I used my Sugar Bubbles 005 plate to stamp the lines using Konad Special polish in white. This is one of those images that I would put into the experienced stampers only box. It was incredibly hard to get straight, but the image picked up perfectly and applied like a dream, mostly diagonally but that was user error!

1 March 2013

I can see your doodle

Doodle Nails! These turned out completely random as most doodles normally do, but I love, love, love them. Worth the hour it took to do 2 nails. I used a plain black nail art pen that I bought from a chemist ages ago. I had to go over the lines about 3 times each to neaten them up and make them super black hence why they took so long, but they are uber cool. There are no real tricks to this besides having a steady hand and a tonne of patience. 


  • Barry M Gelly - Prickly Pear (lilac)
  • China Glaze - White on White
  • China Glaze - Novo (glitter)
  • Black nail art pen.


28 February 2013

Bows and Bling

Another kitchen sinker. With so much going on in my home life (I'm having renos done at my house) there is a certain chaos that surrounds me. I guess that translated onto my nails with a little bit of this and that going on. Bling and bows, baby! And studs, but they didn't start with b.


  • The pink is China Glaze - Pink Voltage, a neon matte creme which is a little sheer. This is two coats but it really could have done with a third.
  • The blue is China Glaze -Towel Boy, a neon blue sheer
  • The glitter is China Glaze - Novo. I only just got this polish and although I have about a gazillion silver glitters, this one has moved to the top of the pile. It has scattered holographic glitter pieces mixed with silver glitter. It is on the chunky side but smoothed down nicely with one layer of top coat. It is beyond sparkly and this picture doesn't do it justice. Keep reading for the plates I used.

The bow on my middle finger is from MLS-05. Click here to see a picture of this plate. The smaller bows are from GA36 which is from the GALS Fairy Set of stamping plates. We stock both if you are interested, come see us at the markets, limited stock available. Stamped with Konad stamping polish in white. The studs are available here.

10 February 2013

Butterfly Wings

After seeing a few beautiful gradient butterfly wing manis, I just couldn't wait to give it a try. Whilst the manis I had seen had been stamped unfortunately the plates I purchased to recreate the look were way too hard to work with, so hand painting was the only way. Cue my trusty sidekick Jules who is always willing to donate her nails to experimentation.


If you would like to recreate this look here are a few pictures to help you out. Its really not too hard, you just need a super thin brush and a steady hand.


Step 1 - Apply white polish to all your nails. Arrrrh un-moisturised granny finger!


Step 2 - Choose your feature colours. The colours I used from left to right, Creative Fantasy which is much more purple IRL, Towel Boy and Pool Party.


Step 3 - Use a sponge to apply your first colour to a section of your nail.


Step 4 - Apply your 2nd colour to the next section of your nail, its OK if you go over the 1st colour, its preferable actually because it helps it all to blend together. You can see the blue has created a purple line where it met the pink.


Step 5- Add your 3rd colour, again going over the 2nd colour a little and sponging all the way to the tip of your nail. If you have long nails use more colours or make your sections wider. A tip when sponging, dip the sponge into the paint then dab a few times on the paper to remove excess paint so that you can gradually build up colour and keep that sponged look rather then a solid colour. Use a cotton bud and small paintbrush to clean off the paint that is on your skin and cuticles.


Step 6- Apply multi coloured micro glitter. My go to micro glitter is Out The Door - Northern Lights. Its freaking gorgeous and is also a fast drying top coat like Seche Vite so you can use it over all your manis for that extra sparkle without creating yet another layer that needs to dry. Its a genius product and a must have for every nail polish addict. Gloss'n' Sparkle Spectraflair topcoat is a great alternative. Another polish you could use instead would be China Glaze - Fairy Dust but you will need to wait for it to dry before moving on to the next step.


Step 7 - Use a super small detail brush and black polish. This is the brush I used. The first stroke is an arch shape.


Step 8 - Add a large petal shape. 


Step 9 - Add another petal shape to the side of the first one making sure its smaller in size than the first one. If your nail is wide add another petal shape.


Step 10 - Use a dotting tool to add tiny white dots around the tip of your nail and down one side. 

Wait a good 5 minutes before applying your top coat so that you don't smudge the black lines or white dots. If you are after the pink, blue or purple polishes we have them all in stock, come see us at the markets. Hope you enjoyed this post and give the design a try. We would love to see :)

5 February 2013

Valentines Day - Round 1

So its almost that time of year again. Some may say its commercial or sappy, but like every girl on the planet when February 14th rolls around, we all want to be the one who gets flowers delivered to their work....am I right? Whilst that's very unlikely to happen to me, I'm lucky that I have a husband who showers me with love everyday of the year and for that I'm very thankful. Love you Frankie Baby...smooches!


  • China Glaze 'Pool Party' - Neon pink creme
  • China Glaze 'Flip Flop Fantasy' - Neon Coral creme
  • China Glaze 'White on White'
On my thumb I stamped with CG Pool Party using BM-303. It changed colour a little and went a more mellow pink. On my ring finger I stamped with Konad White and BM-303. The BM 300 series is available here. On my pinkie I used white striping tape to create the lines, the coral polish underneath sort of showed through the white tape making it look like a lighter pink, but its actually just white tape.


So I hope this first VD Mani finds you with someone to smooch.

If anyone is keen on the two pink colours we have them in stock now.

10 January 2013

Marbling with Cirque de Soleil

Today was "muck around with some of your untrieds" day, and shamefully there are many untrieds in my collection. They are all sitting on my desk waiting for their day in the sun. Well today I managed to pack 3 un-tried polishes into one manicure. The blue in the water marble really stole the show for me in this mani, its such a devine colour and the way it swirled together with the purple, its like an organic neon abstract animal print thing......ok I'm stopping, Ive been watching way too many episodes of Project Runway.

Blue: China Glaze - Hanging in the Balance
Purple: China Glaze - Creative Fantasy
Pink - China Glaze - Escaping Reality


I painted the accent nail with one coat of Kleancolour - White. Then I mixed 2 drops of blue, 2 drops of purple and one of the pink polish into the water in a bullseye pattern. The pink wanted to take over when I did just one drop of each, it was super runny and kind of bled into the blue and purple, hence why I added 2 drops of those each time. I did it in a shot glass to try and save polish but don't think I will do this again, its hard to manoeuvre your finger over where the best part of the marble is in the water and its easy to bump your nail while it's still in the water and you are removing the extra polish. I wish the pink would have come out a little more vibrant in the marble but it still looks really nice. This pink is a little pinker and less orangey in real life. The afternoon sun has given it a slight orange tint.


China Glaze - Escaping Reality


China Glaze Cirque de Soleil collection (minus the red and black glitter, I didn't get that one as the reviews from other bloggers turned me off, apparently the formula was a bit dodgy and red and black is not a combo I would normally gravitate to anyway). Click here for an earlier post devoted to this collection.

5 January 2013

Glitter Kitty

Animal print, you either love it or hate it. After months of sticking to stamping animal prints I have recently been experimenting with applying these designs free hand. Whilst I am yet to master the zebra print I'm feeling pretty confident with the cheetah print. The beauty of this print is that flaws make it more authentic, so try to make them uneven and messy, its looks much better.


The base colour is China Glaze Glistening Snow. This polish is a multi coloured silver glitter that develops some holographic qualities in sunlight. It has a rough sandy texture however smooths down with top coat. It made applying the animal print a little tricky due to the uneven bumpy texture however like I said, animals print isn't supposed to be perfect. For the coloured dots I used glequins (of course) then used a black nail art pen to draw random "c" shaped black lines around the glequins, then added a few dots and squiggles here and there. I used 2 coats of top coats for this design in an attempt to gloss up and smooth down the Glistening Snow. Reeeeow!

11 December 2012

Aussie Christmas Challenge: day 9 - green

Aussie Christmas Challenge: day 9 - green. I had intended to do some art over the top of this green but it was just so sparkly and glittery I couldn't cover it up. China Glaze Running In Circles. 


The formula for this polish from the Cirque De Soleil collection is really good. The glitter spreads evenly without being streaky. It is opaque in 2 thick coats. It wears well and is relatively easy to remove considering how difficult some glitters can be. This picture was taken in sunlight.


We will be stocking the heart sequins in the shop at www.dramaqueennails.com from January 2013.

10 December 2012

Aussie Christmas Challenge Day 7: Aussie Sunset

You're looking so hot today Rhonda......like a sunrise! (Aussie joke). So here we are on day 7 of the ACC. I love gradients and there is nothing more beautiful as the colours that melt together in the sky as the sun is setting.

For the gradient I used:
  • Zoya Pippa - banana yellow creme
  • China Glaze Japanese Koi (neon) - dark orange neon creme
  • China Glaze Love's a Beach - hot pink neon shimmer
For the water marble I used:
  • China Glaze Japanese Koi (neon) - dark orange neon creme
  • China Glaze Love's a Beach - hot pink neon shimmer
  • Zoya Yummy - a sky blue creme
  • China Glaze Sun Kissed - a neon yellow shimmer
 I have added my gradient tutorial in for everyone as I used this method for this design just added another line of colour.


6 December 2012

Puzzle your friends with your amazing nails

Rubik's Cube! I had to throw these up here even though I did them a while ago as I still get heaps of questions about them from my followers on IG and FB. How did you do these? How did you get them so neat?


Simple answer...they took agesssssss! I will do a tutorial for them when I have more time but for now here is a quick explanation.

  1. Paint your nails black. Wait for them to dry COMPLETELY or apply a fast drying top coat to cheat a little and get them to dry fast.
  2. Cut up 30 pieces of striping tape
  3. 3. Lay them in a tic-tac-toe arrangement however also add a strip to the top and bottom of the nail
  4. Fill in all the little square spaces with a small detail brush. 
  5. Remove tape in the reverse order to how you applied it - super important! 
  6. Use a black striping brush/polish to run over the lines if they are a little messy and add some black to each side of the nail.
  7. Wait for at least 10 min before applying top coat so that your lines or colours don't smudge or smear.


It's really not too hard just a little time consuming :) As for the polishes I used, well I kinda mixed and matched a few polishes together to get the right hue for the Rubik's Cube colours. If you give them a try I would love to see so please share. On a side note...I had a Rubik's cube when I was little and for the life of me I could never work it out and drove me to despair that I couldn't solve it lol 


4 December 2012

China Glaze Cirque de Soleil Collection

My another super naughty polish splurge has arrived. The Cirque De Soleil World's Away Collection.  I am beyond happy that I weakened for this collection because I love every colour. Scroll down to see the names of the polishes. The collection contains 5 glitters, 3 chunky and 2 small glitters. The rest of the polishes are cremes, except for the red which is a shimmer.


LinkWithin

Related Posts Plugin for WordPress, Blogger...