10 December 2013

Gloss 'n Sparkle - perfection!

Long time no see! This time of year is super crazy for me. I have to pack up my classroom and move schools again so there hasn't been much time for nails. The flip side is that in 2 days I am on holidays for a month so I promise to whip up some new nail art for you guys and give my blog some TLC. 

Today I wanted to share a few swatches of some new Gloss n Sparkle shades that were very kindly given to me to try. Being a die-hard GNS fan girl already, of course there was jumping, squealing and maybe even a little peeing when they arrived in the mail. So without further adieu here are 3 new GNS polishes to drool over.


This is Can't Even breathe. My absolute fav of the bunch. Its a dusty lilac/purple jelly base with a mix of bronze, blue, and magenta hexagons with black, bronze and pink microdots. This is 2 coats with topcoat in sunlight. 

If you have been living under a polish rock for the last few years Gloss "n Sparkle is Australian made, hand mixed indie polish. The polishes are 3 free, come in beautiful holo bottles and are super high quality. Many of my clients ask me "Are Aussie indie polishes as good as the big brands?" - to this I would answer no...they are much, much better!


The second polish is Damsel in a Dress. A bubblegum pink jelly base with pink, purple and icey white hexagons. There are some pink microdots and larger dots in the mix too. GNS polishes have a very forgiving formula. You don't need to fish for glitter, the base is not too thick, just runny enough to get the floaty jelly finish. Dreamy!


The final polish is The Lotus Eater. A vibrant blue jelly with magenta, aqua and blue hexes, dark blue and aqua microdots and aqua squares. This is 2 coats with topcoat in sunlight. Stay tuned for some more GNS swatches later in the week.

Please go and check out Gloss 'n Sparkle, but prepare for your wallet to take at beating as you try your hardest not to go crazy....good luck with that! Need all the GNS!

25 October 2013

Glamoween 2013

This year for Halloween DQN is banishing the goo and replacing it with glam! If you would like to join in the fun tag your creation with #dqnglamoween. We would love to see your fab glamorous creations. This is our third glamoween mani with more to come leading up to the 31st of October.


Today's design features:
  • Zoya - Dahlia (black Pixie)
  • Wing Dust - Feel the burn (hot pink glitter jelly)
  • OPI - My boyfriend scales walls


I stamped the sugar skulls with Kleancolor - Metallic Black. I like this polish for stamping as it smears a whole lot less than Konad black and gives you a sparkly effect through your image. The skull images are from the Bundle monster - Create your own collection: plate BM-413


These are the other two manis I have done so far as part of this year's Glamoween series.


Ripped flesh with China Glaze - Ruby Pumps and Essie - Sand Tropez


Dripping glitter with Picture Polish - Heavy Metal and spiky studs. The blood splatter print is also from the Bundle monster - Create your own collection ans stamped again with Kleancolour - Metallic Black.


I love these studs, the multi faceted face reflects the light and makes them super shiny.


They were however very hard to photograph due to their 3D design.


Blood splatter image.

Stay tuned for more glittery, girly manis for Glamoween 2013.

17 October 2013

Bundle Monster - Create your own nail stamping plate collection

New to the BM range, a set of plates designed by nail stamping fans. It's a great mix and just when you thought I've got all the plates I'll ever need....think again. They're awesome! Available now from Drama Queen Nails. 


Yeah I love nails too! And geeks!


I'm loving the triangles - this image would work great for reverse stamping.


Dripping paint, whoever submitted that design is a genius.


Kitties and owls and interlocking dots, this a favourite plate of the set for me.


This Halloween plate is so rad....need to use that sugar skull stat!


Dress up your nails for a fancy night on the town.


Finally a zig zag image with thick stripes! I can't wait to use this image.


Oh yes! Love this plate.

Overall this set is really well rounded. It's got a great mix of both full prints and accent images that are different from all the other BM sets. The advantage of having nail stamping crazies dream up designs is that there is a cross over between nail art techniques. Take for example the dripping paint image. Easy to do with a dotting tool but noe even easier with a stamp. 

13 October 2013

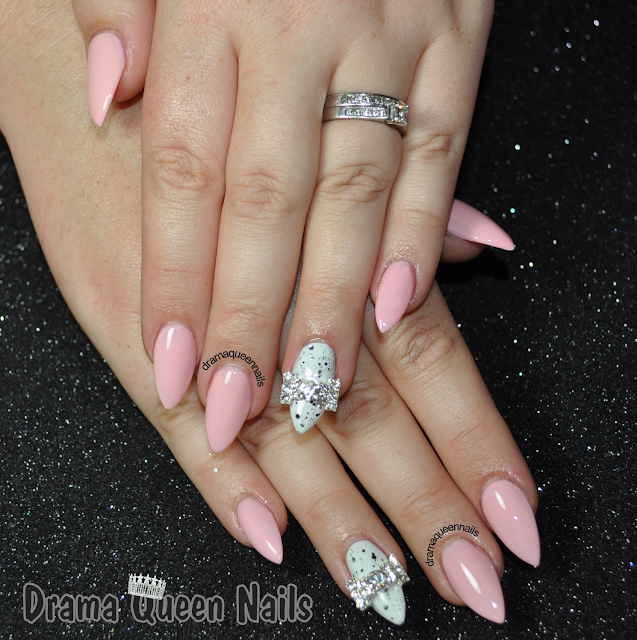
The almond nails experiment

Adelle, Rihanna, Lady Gaga and now Jules......it's time to get your talons on! Having only ever had square nails Julsie has taken a leap of faith and tried something a little different. Whilst not for everyone I personally love almond shaped nails. I think they look glamorous and minxy and I am spitting the dummy that I wasn't brave enough to go for it. Never mind, I'll have to live vicariously through Jules for now.


Todays design features;
  • Barry M - Baby Pink
  • OPI - My boyfriend scales walls
  • Essie - Set in stones (silver glitter)


 If you are thinking about drastically changing the shape of your nails I would invest in some stick ons, shape them and try them on to see if they suit your hands. To achieve the almond shape you will need to either use an acrylic or gel overlay/extensions over your natural nails to get the required strength to maintain the pointed end. 


 So fancy! I want almond nails so bad. Will you all stop following me if I leave behind my squaries? Waaah!

3 October 2013

#31dc2013 - The Round-up Post

Let's take a look back at all the creations from this year's challenge. 


Montage! Gunna need a montage! 


Day 1 Red


Day 2 Orange


Day 3 Yellow

Day 4 Green


Day 5 Blue - I really loved this mani and was sad that I had to take it off the next day, it was really beautiful.


Day 6 Purple - Loved this one too and will be doing lots more ombre claws in the future.


Day 7 Black and White - Jules tapped in for this one. Funky!


Day 8 Metallic


Day 9 Rainbows. My addiction to Zoya Pixies was full blown by this stage.


Day 10 Gradient, which I personally think should be replaced with unicorn day next year.


Day 11 Spots


Day 12 Stripes


Day 13 Animal print: Peacock. I was raging on this day because my stamping bled into colour underneath when I applied topcoat but with perspective it was still nice.


Day 14 Flowers. Julsie helped out with next 2 days so I could have a break. Isn't she the best sis ever!


Day 15 Delicate Print


Day 16 Aztec


Day 17 Glitter


Day 18 Half moon


Day 19 Galaxy


Day 20 Watermarble Aargh! This day does NOT get any easier the 2nd time around. I am convinced that living in QLD with our high humidity and temps does make it difficult to get the polish to spread well. Perhaps it's just me?


Day 21 Inspired by a colour


Day 22 Inspired by a song: Rihanna Diamonds.


Day 23 Inspired by a movie: Splash!


Day 24 Inspired by a book: Clockwork Orange


Day 25 Inspired by fashion


Day 26 Inspired by a print


Day 27 Inspired by an artist: Ken Done


Day 28 Inspired by a flag: Pride flag


Day 29 Inspired by the supernatural


Day 30 Inspired by a tutorial: Reverse stamping


Day 31 Honour someone you admire: Chalkboard Nails


That's a wrap! 


LinkWithin

Related Posts Plugin for WordPress, Blogger...