28 February 2013

Bows and Bling

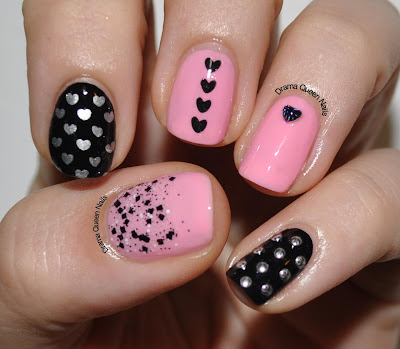
Another kitchen sinker. With so much going on in my home life (I'm having renos done at my house) there is a certain chaos that surrounds me. I guess that translated onto my nails with a little bit of this and that going on. Bling and bows, baby! And studs, but they didn't start with b.


  • The pink is China Glaze - Pink Voltage, a neon matte creme which is a little sheer. This is two coats but it really could have done with a third.
  • The blue is China Glaze -Towel Boy, a neon blue sheer
  • The glitter is China Glaze - Novo. I only just got this polish and although I have about a gazillion silver glitters, this one has moved to the top of the pile. It has scattered holographic glitter pieces mixed with silver glitter. It is on the chunky side but smoothed down nicely with one layer of top coat. It is beyond sparkly and this picture doesn't do it justice. Keep reading for the plates I used.

The bow on my middle finger is from MLS-05. Click here to see a picture of this plate. The smaller bows are from GA36 which is from the GALS Fairy Set of stamping plates. We stock both if you are interested, come see us at the markets, limited stock available. Stamped with Konad stamping polish in white. The studs are available here.

22 February 2013

Jelly Sandwiches are so delicious

So you've been lusting after a stream of hard to find indie glitter polishes? The reality of being a nail polish collector is that you cant always have every polish (I know!). As much as you try some brands are just really difficult or very expensive to get to Australia. Nail mail buddies are great, but for those of us who need instant gratification why not try creating your own unique polish or duplicating a hard to find polish by making a jelly sandwich.


So what is a jelly sandwich? Its much like a normal sandwich, layers of stuff put together to make one delicious treat. Traditionally a jelly sandwich consists of 1 or 2 layers of a sheer polish, then a layer of glitter, plus another layer of the sheer polish. However I find the best way to create the sandwich is to start off with one coat of an opaque creme polish. This takes away the nasty VNL and speeds up the drying time.


Layer your favourite glitter over your base colour and give it a good chance to dry so that it doesn't move in the next step.  Choose a sheer version of the colour you used on the bottom. You can tell if a polish is sheer 2 ways. If you have to do more than 3 coats to get opacity you've got yourself a sheer. Also if you can see the polish brush easily through the polish, then its a good chance its a sheer. Apply one coat of the sheer polish over the top of the glitter. Let it dry then apply your top coat. Voila, jelly sandwich.


The polishes that I used: Bottom layer is OPI Skull and Glossbones, Glitter is Chi Chi Gliterazi and the sheer layer is OPI My Pointe Exactly.

I love how this turned out. If I would have used white on the bottom I reckon I could have gotten very close to recreating China Glaze Its a trapeze. So if you are lusting for some hard to find indie polishes, or perhaps you are on a no buy and looking to create something new to trick yourself into thinking you have new polish, then jelly sandwich it up! Mmmm tasty.

21 February 2013

Nail Craze or Crazy Obsession?

We did a guest post for the lovely Natalie from NailzCraze. Is nail art destined to be just a phase or will we see girls sitting in psychologists offices one day seeking help for their nail polish addictions? It made me think...... Ink blot Nails. Check out the post for lots of pictures and a quick tutorial for how to create the design. nailzcraze.blogspot.com


13 February 2013

Valentines Day - Final Round

Well if Ryan Gosling hasn't rung you for a date for tomorrow by now, it might be time to face facts that he isn't going to call. But that doesn't mean you cant have a fabulous V Day. In the words of two very wise souls you should just "Treat yo self!". Ryan if you're reading this..... I'm totally free.


The red is China Glaze- Ruby Pumps. One of my all time favourite red glitter polishes. To do this design I put 3 big dots of white paint in a line down my nail then dragged a toothpick straight through the centre of them all. With your base coat do one layer and let it dry completely  Then add another thick coat, but don't let it dry, quickly dot the white on, then drag the toothpick. I will be using a pin the next time I do this to see if I can get a more defined drag line.


The accent nail is Konad white special stamping polish. I used the Dash 20 stamping plate. Both of these can be found here.

10 February 2013

Emily De Molly - Dark Crystal

Somebody call the morgue. I am obviously dead, because Im in polish heaven right now. I cant see the white light but I can see bazillions of sparkles! Is this polish not tre amazing? Nail jizz! 


Dark Crystal is a black jelly polish, with rainbow scatter holographic glitter. Its made by the amazing Emily De Molly, an Australian indie polish maker. It's 3 coats to opacity or 1 coat over a black creme polish. With just 2 coats on its own there was some VNL but it still looked amazing.


Close up in the sunlight

Sunlight with top coat. The formula was fantastic. It spread evenly without creating bald spots. It dried quickly and smoothly. 


Such a chic colour with sparkles that aren't so in your face, perfect for those occasions when you have to tone it down a little but still want something fun. How have I let this beauty sit in my untrieds pile for so long? BTW I'm alive and well so no need for the morgue just yet, hopefully me and my Emily De Molly Dark Crystal will live a long and happy life together.


Indirect sunlight

Butterfly Wings

After seeing a few beautiful gradient butterfly wing manis, I just couldn't wait to give it a try. Whilst the manis I had seen had been stamped unfortunately the plates I purchased to recreate the look were way too hard to work with, so hand painting was the only way. Cue my trusty sidekick Jules who is always willing to donate her nails to experimentation.


If you would like to recreate this look here are a few pictures to help you out. Its really not too hard, you just need a super thin brush and a steady hand.


Step 1 - Apply white polish to all your nails. Arrrrh un-moisturised granny finger!


Step 2 - Choose your feature colours. The colours I used from left to right, Creative Fantasy which is much more purple IRL, Towel Boy and Pool Party.


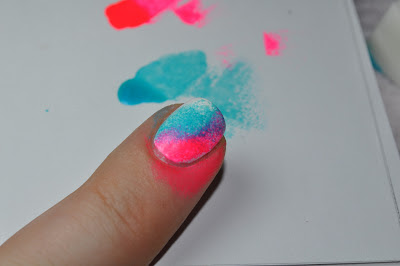
Step 3 - Use a sponge to apply your first colour to a section of your nail.


Step 4 - Apply your 2nd colour to the next section of your nail, its OK if you go over the 1st colour, its preferable actually because it helps it all to blend together. You can see the blue has created a purple line where it met the pink.


Step 5- Add your 3rd colour, again going over the 2nd colour a little and sponging all the way to the tip of your nail. If you have long nails use more colours or make your sections wider. A tip when sponging, dip the sponge into the paint then dab a few times on the paper to remove excess paint so that you can gradually build up colour and keep that sponged look rather then a solid colour. Use a cotton bud and small paintbrush to clean off the paint that is on your skin and cuticles.


Step 6- Apply multi coloured micro glitter. My go to micro glitter is Out The Door - Northern Lights. Its freaking gorgeous and is also a fast drying top coat like Seche Vite so you can use it over all your manis for that extra sparkle without creating yet another layer that needs to dry. Its a genius product and a must have for every nail polish addict. Gloss'n' Sparkle Spectraflair topcoat is a great alternative. Another polish you could use instead would be China Glaze - Fairy Dust but you will need to wait for it to dry before moving on to the next step.


Step 7 - Use a super small detail brush and black polish. This is the brush I used. The first stroke is an arch shape.


Step 8 - Add a large petal shape. 


Step 9 - Add another petal shape to the side of the first one making sure its smaller in size than the first one. If your nail is wide add another petal shape.


Step 10 - Use a dotting tool to add tiny white dots around the tip of your nail and down one side. 

Wait a good 5 minutes before applying your top coat so that you don't smudge the black lines or white dots. If you are after the pink, blue or purple polishes we have them all in stock, come see us at the markets. Hope you enjoyed this post and give the design a try. We would love to see :)

9 February 2013

Oh no! Don't chop it, patch it!


Step 1: Give your broken nail a quick file to smooth out the surface then wipe it over with acetone to remove file dust, oil or anything else on the surface of the nail.
Step 2: Choose the right size patch for your nail. I always do mine a little bigger than the nail and at the end of the Step 5 I file it back to the exact size needed. 
Step 3: Use tweezers to separate the patch from the backing paper and stick to nail. Patches are self adhesive so will stick to nail straight away. I then use my tweezers to smooth it down with no bubbles and push in around the edge of the nail. I then go underneath my nail and push up against the patch around where the nail was split. Cut off any patch at the top of nail that is not needed.
Step 4: Apply a thin layer of resin. The thinner the better, try not to double stroke over any areas. Wait 20 minutes, then apply a second thin coat of resin. Wait another 20 minutes until completely dry.
Step 5: Use the white side of your nail buffer to smooth over the surface of your nail. Use your finger to run over the top to feel if it is smooth, especially where the patch begins, you don’t want a little “hump” showing through your manicure. I then use my normal nail file to shape the patch around the sides and top of my nail. I ended up shortening my nail a little bit in this process to get it even but they were due for a mini chop anyway.
Step 6: Wipe over with normal nail polish remover (no acetone) to remove any file dust. Acetone will undo all the hard work you have just done. 
Step 7: Apply your base coat as normal. Nail saved!

You can get the patches and glue from here.

8 February 2013

Valentines Day - Round 2

Only 8 days left to find your knight in shining armour to whisk you away to your happily ever after.....in the meantime I hope you enjoy the 2nd of my Valentines Day manicures. This one is a little more traditional with pink and hearts a plenty.


The pink is Barry M - Strawberry Ice cream. The black is China Glaze - Liquid Leather. 
On my thumb I used Daring Digits - Blackberry Square which is quickly becoming my most loved indie. I'm a sucker for anything black and white and its got squares in it....oh yeah. For my pinkie I used silver metal studs. It was so hard to get a good picture of them, they are super shiny and amazing and I will be using them again very soon. You can get the studs here. The little heart is this gorgeous stick on black opal mini gem. Its a black holographic colour and I cant stop staring at it! They come in a set with 9 other colours and you can get them here. 


The hearts on my index and middle fingers were stamped. Index was MLS-05 plate and the hearts in a row were created by Natalie from NailCraze NC 01. I think I totally fluked getting them in the middle of my nail. The plate stamped beautifully and I cant wait to try the butterfly prints and the feather.


Instagram Nail Art Contest Winners

Thank you very much to all the fabulous and talented ladies who took the time to design and paint their nails for our drama themed Instagram Nail Art Contest  We truly appreciate everyone's hard work but alas there can only be 2 winners. I wish I could insert a drum roll sound bite......

Beginner Winner @lorrele 


Our followers loved your pink gradient and use of bling. So pretty and girly and like one follower said "Bling goes with everything!" So true. Congratulations @lorrele  - please contact us on Facebook or IG to organise your prize delivery.

Professional Winner @hoyobie


From the crown to the meltdown face to the crazy happy mask, this design screams dramatic. The face on the index finger is the face I make on a daily basis when I'm drama-queening. Genius! This mani more than any of the others that entered really summed up the theme of the contest. Congratulations @hoyobie - please contact us on Facebook or IG to arrange for your prize to be sent to you. 

Both of our winners will receive this prize pack and also be featured on our Facebook page and Instagram account. Thanks again for entering and we cant wait to do another contest...stay tuned.

5 February 2013

Valentines Day - Round 1

So its almost that time of year again. Some may say its commercial or sappy, but like every girl on the planet when February 14th rolls around, we all want to be the one who gets flowers delivered to their work....am I right? Whilst that's very unlikely to happen to me, I'm lucky that I have a husband who showers me with love everyday of the year and for that I'm very thankful. Love you Frankie Baby...smooches!


  • China Glaze 'Pool Party' - Neon pink creme
  • China Glaze 'Flip Flop Fantasy' - Neon Coral creme
  • China Glaze 'White on White'
On my thumb I stamped with CG Pool Party using BM-303. It changed colour a little and went a more mellow pink. On my ring finger I stamped with Konad White and BM-303. The BM 300 series is available here. On my pinkie I used white striping tape to create the lines, the coral polish underneath sort of showed through the white tape making it look like a lighter pink, but its actually just white tape.


So I hope this first VD Mani finds you with someone to smooch.

If anyone is keen on the two pink colours we have them in stock now.

3 February 2013

Instagram Nail Art Contest - Finalists

Help DQ Nails pick the 2 winners of our Instagram Nail Art Contest. There are 2 categories Pro and Beginner. Head on over to our Facebook Page and 'Like' and comment on all your favourites and they might win prize packs and have their nail art featured by us. So many great entries. Thank you so much to everyone who entered. If you like these artists check out their Instagram profiles, just look for the tags on their pictures. Best of luck everyone.


1 February 2013

Monochrome Madness meets Dashica stamping

Black, white and grey, a classic combo that never goes out of style. And with Valentines Day just around the corner, I suppose it's time to start hiding a few hearts here and there. Got to LOVE the kitchen sink mani, solves the problem of never being able to decide what to do. Do everything! 


The grey is China Glaze Recycle with China Glaze White on White. The black is OPI Black, I have no idea what its called the sticker fell off ages ago. I stamped with Barry M Silver Foil and used plate Dash8 from the Dashica 20 piece stamping collection. The glitter is an indie polish from All That Glitters called Space Rock.


Here is the set in its entirety and it comes in this amazing little storage purse...cute! You can get the set from here.


The plates are super high quality and stamp exceptionally well and when you think of the cost of individual Konad stamping plates they are great value.

LinkWithin

Related Posts Plugin for WordPress, Blogger...