30 January 2013

Daring Digits - More Dots

Apologies for being MIA lately. Lots been going down in this crazy place we call Australia. Bush fires and heat waves in one state, mini tornados and devastating floods in two others. I spent Monday helping out my two wonderful sisters save their gym and pool from flooding again. They were completely inundated in January 2011 and for a while there it looked like it was happening all over again. But thankfully the river peak was lower than expected and the gym and pool were spared. However thousands of families across QLD and NSW have had their lives devastated by the recent floods and its heartbreaking to see them going through it all again when many had only just finished rebuilding from 2011. Not to trivialise anything but lets move on to something a little more uplifting....


Daring Digit - More Dots
This is one layer of More Dots over one layer of Barry M Black.


This polish is a grey jelly base with multi coloured round glequins. You could wear it alone however you would need 3 or 4 coats to opacity. The application was pretty good, I did have to move the glequins around a little to space them out but that's pretty normal for indie glitters. You can find Daring Digits here.

17 January 2013

Everything but the kitchen sink

So a trend that is becoming really popular in DIY nail art is the next step up from the ring finger accent nail. Consider all your nails as accent fingers and you've got yourself a kitchen sink mani. Do something different on each finger but tie it all together with colours or shapes somehow. This is my version.


  • Pointer finger is a reverse gradient with China Glaze Recycle and China Glaze Some Like it Haute (glitter)
  • Thumb and middle finger is China Glaze Recycle stamped with BM 314 and Kleancolours Metallic Black, which works awesomely for stamping and has a slight glitter to it in the sun.
  • Ring finger is China Glaze Some Like it Haute 3 coats no undies.
  • Pinkie finger is Recycle and Metallic Black. I did the gradient using this method.
Any excuse to go crazy and do a bunch of different stuff in one go suits me perfectly, I love this mani and will definitely be doing kitchen sinkers lol in the future.

12 January 2013

The Dito collection by Karpati

Well this is different. A nail polish bottle with spaces for your fingers. "Simply slip the bottle onto your fingers like a ring and lacquer away". Alrighty then, here goes...


Chromatic | Refract by Karpati is just one of 38 polishes from their Dito Collection. A collection of polishes offering the perfect solution for the practical application of nail polish. The innovative design is so unique that it has been included in the ‘Design Collection’ of the Museum of Modern Art in New York. Chromatic is one of 7 polishes in the Refract collection. It is a sheer silver polish with micro silver scattered holographic glitter. It has a smooth finish, the glitter is not raised above your nail, its embedded in the polish. 


This is 2 coats with no base or topcoat in morning sunlight. Its definitely a 3 coater if you don't want VNL, or you could layer it over a nice silver/grey undie to make it more opaque.


So is the design just a gimmick or does it actually work? 


Well holding the bottle in-between my fingers was easy, it felt steady and stayed put nicely. It didn't get in the way and allowed me to position my hand on the table the way I normally would when painting my nails. Its really quite clever. I can see the benefits of being able to apply polish this way say if you were in a rush and had to do your nails in the car or train etc. I really like that about this bottle design, its a definite pro. One thing however is the brush and the lid of the bottle. Its an awkward shape to hold and use and the brush was just average, a little on the skinny side. I had a derpy moment when trying to flip the brush over to use the paint on the other side. Another downside, the bottle does not stand up on its own. All my polishes are stored upright so my OCD is tingling just a little, but if you are carrying it around in your bag to do whilst you are out, its fine.


Awkward hand pose, the model on the box does it so much better lol This is with SV topcoat.

So the formula, it is 3 free and claims to be non streaky  I found it to be a little bit streaky, but with topcoat it's not noticeable and for a holographic polish its pretty good for application. It didnt erase itself or get bald patches. I stumbled across this polish from my Lust Have It box. Its a high end polish line and expensive. $20AUD for a bottle plus $10 shipping so definitely a splurge polish. The design really is clever and functional enough to make it worth buying 1 bottle for fun. The colour is really pretty and if they have a black version I'm all over it.


                         More details on the DITO collection by Karpati can be found here.

10 January 2013

Marbling with Cirque de Soleil

Today was "muck around with some of your untrieds" day, and shamefully there are many untrieds in my collection. They are all sitting on my desk waiting for their day in the sun. Well today I managed to pack 3 un-tried polishes into one manicure. The blue in the water marble really stole the show for me in this mani, its such a devine colour and the way it swirled together with the purple, its like an organic neon abstract animal print thing......ok I'm stopping, Ive been watching way too many episodes of Project Runway.

Blue: China Glaze - Hanging in the Balance
Purple: China Glaze - Creative Fantasy
Pink - China Glaze - Escaping Reality


I painted the accent nail with one coat of Kleancolour - White. Then I mixed 2 drops of blue, 2 drops of purple and one of the pink polish into the water in a bullseye pattern. The pink wanted to take over when I did just one drop of each, it was super runny and kind of bled into the blue and purple, hence why I added 2 drops of those each time. I did it in a shot glass to try and save polish but don't think I will do this again, its hard to manoeuvre your finger over where the best part of the marble is in the water and its easy to bump your nail while it's still in the water and you are removing the extra polish. I wish the pink would have come out a little more vibrant in the marble but it still looks really nice. This pink is a little pinker and less orangey in real life. The afternoon sun has given it a slight orange tint.


China Glaze - Escaping Reality


China Glaze Cirque de Soleil collection (minus the red and black glitter, I didn't get that one as the reviews from other bloggers turned me off, apparently the formula was a bit dodgy and red and black is not a combo I would normally gravitate to anyway). Click here for an earlier post devoted to this collection.

8 January 2013

Confessions of a glequin addict

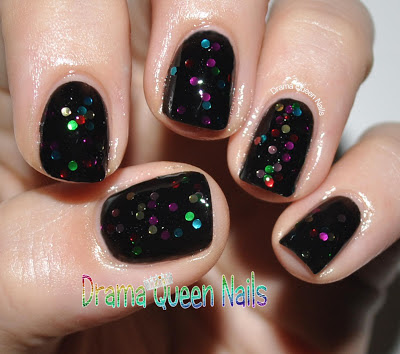
Yeah, yeah, so I used glequins again...I promise though, there was a plan behind it all. With my last few designs I have been curious to see just how many different ways you can use them to mimic painted nail art techniques. Also I get so many questions about 2 things, how to apply glequins and what is striping tape. So today's experiment was put all those nail art elements together in an attempt to show how I use both glequins and striping tape and also to see if glequins could;

1. Do a gradient
2. Be used as polka dots
3. Lastly be used with striping tape to make lines or cut out sections.


Well I'm not entirely sold on the gradient, it looks kinda messy and chunky and doesn't have the nice fade effect so I probably need to work on that and tweak it a bit. The polka dots look cool, will definitely be using glequins for that look again. And the striping tape...hmm well, the jury is out on this one. This is the first time I have tried something like this so it was bound to have its imperfections.  I do think there is something there though, just the placement of the stripes and the sections covered needs to be reworked. I think its important to show your nail failures as much as your successes as we learn from others and also ourselves and there are many times when I do a design just for the practice then take it off straight away.


The tools I use when working with glequins. A small dotting tool to pick up each sequin, a piece of tin foil to put a little dab of base coat on. I dip into the little dot to make the end of my dotting tool sticky so it can pick up things. I normally apply base coat directly on my nails where I want to apply sequins, working with small areas at a time so that it doesn't dry on me. If I have gaps to fill I will use the dotting tool to put a tiny dot of base coat in the hole then stick the sequin over it. You can get the glequins here.


To do the stripes on my middle finger I used striping tape. Striping tape is very thin tape that can be used to make straight lines or as a straight line feature over the top of polish. It comes in many colours but there are two main kinds, holographic pretty tape and plain matte rubbery tape. The rubbery kind is best for geometric designs likes lasers or the Rubiks Cube nails that I did. Whilst the fancy holographic  looks really nice as a feature. It does still make clean lines its just a bit more finicky. You can get striping tape here.


I applied the tape, then painted base coat in-between, like in rows, then applied the glequins. Normally I would advise to pull the striping tape off as soon as you are finished painting that area, it gives cleaner lines. However as I was working with something chunky that I didn't want to move until it was set I left the tape on until I was finished the whole nail.


The base colour I used was OPI Skull & Glossbones, a putty grey creme, my go to grey as it is opaque in two coats and the colour is just so fab and chic. This polish is from the Pirates of the Caribbean collection. I hope you guys had a few of your questions answered with this post. Please comment below if there is anything else you would like to know.

6 January 2013

Glequin Zip Zags

You know I love a glequin at the best of times, but combine them with one of my other favourite designs zig zags, and you've got a winning combo. Don't even ask me how long they took, it was at least 2 vodkas! The nude colour is OPI Don't Pretzel My Buttons. 


1. Start by painting all your nails with your contrast colour, or in my case I was going for a more muted background to tone down the explosion of colour of my accent nails.

2. Use a nail art pen or striper to roughly sketch out a zig zag line across the middle of your accent nails to get the general shape you want to follow when applying the glequins.

3. Use glue or base/top coat to apply glequins. I painted a bit of basecoat to one side of my zig zag (don't do the whole line because it will dry before you get to the other side) then put a dab of base coat on a bit of paper. I used a small dotting tool, dipped it in the tiny dot of base coat I had on the paper just to make the dotting tool a little sticky to enable me to pick up each glequin and precisely place it.

4. Move row by row working first down from the middle where you drew your line to the cuticle, then again from the middle up to the tip of your nail. Fill in any areas at the cuticle and tip with extra glequins to fill spaces if necessary.

4. Wait a few minutes for the glequins to set and dry.

5. Apply top coat making sure to re-stroke over any places where you see bubbles forming. It can happen, you have an uneven surface so bubbles may form near joins etc

6. Apply a 2nd coat of top coat to give a super flat glossy finish.

You could definately do all your nails with this design, it would look spectacular but realistically you are looking at 3 hours plus to do something like that.

These hexagons glequins are available now from Drama Queen Nails

5 January 2013

Glitter Kitty

Animal print, you either love it or hate it. After months of sticking to stamping animal prints I have recently been experimenting with applying these designs free hand. Whilst I am yet to master the zebra print I'm feeling pretty confident with the cheetah print. The beauty of this print is that flaws make it more authentic, so try to make them uneven and messy, its looks much better.


The base colour is China Glaze Glistening Snow. This polish is a multi coloured silver glitter that develops some holographic qualities in sunlight. It has a rough sandy texture however smooths down with top coat. It made applying the animal print a little tricky due to the uneven bumpy texture however like I said, animals print isn't supposed to be perfect. For the coloured dots I used glequins (of course) then used a black nail art pen to draw random "c" shaped black lines around the glequins, then added a few dots and squiggles here and there. I used 2 coats of top coats for this design in an attempt to gloss up and smooth down the Glistening Snow. Reeeeow!

2012 Christmas manis

Yes I'd like mine gift wrapped please. After a deluge of red and green nails over the past few weeks I was so anti traditional Christmas nails. So I went for bling instead.

China Glaze Its A Trap-eze (from the Cirque de Soleil collection) with accent nail of Color Club Harp On It. Stamped using Konad special stamping polish in black and MLS-05 stamping plate. And of course because its me and I cant help myself I had to add a glequin, cause im a gleq lol 


My awesome sissy la la nails, Deborah Lippman - Candy Shop with OPI - My Very First Knockwurst (Germany collection). These studs and glequins are available from www.dramaqueennails.com


OPI - Lincoln Park After Dark

OPI describes this polish as "where midnight meets purple". Spot on! In normal light it appears as black however in sunlight you can see the purple undertones. It looks more purple in the bottle then it does on your nails. This is 2 coats with top coat. Its a crème formula that applied very well and dried to a glossy finish. This polish is from the Chicago collection.


Clean up for this polish is tricky due to its opacity and dark colour so try really hard not to flood your cuticles.

Gloss 'n' Sparkle - Berry Delicious

Berry Delicious indeed. Its like Barbie vomited on my nails and I LOVE her for it. Another unique and gorgeous indie polish from Australian polish maker Gloss 'n' Sparkle. Its a pink creamy base with small red, blue and purple hex glitters.


The formula for this polish was truly excellent. Glitters can be notoriously hard to paint with but I just applied this as I would a normal polish. This is two coats with topcoat. I didn't have to move the glitter flecks around, this is exactly how they came out of the bottle and they are pretty evenly spaced around. I used Seche Vite as my topcoat and it did ripple the finish just a little so next time I would probably use a different topcoat to be on the safe side. 


This polish and many others are available from the Gloss 'n' Sparkle Etsy store.

LinkWithin

Related Posts Plugin for WordPress, Blogger...